Showing posts with label Fall. Show all posts

Thursday, October 18, 2012

Halloween Decor

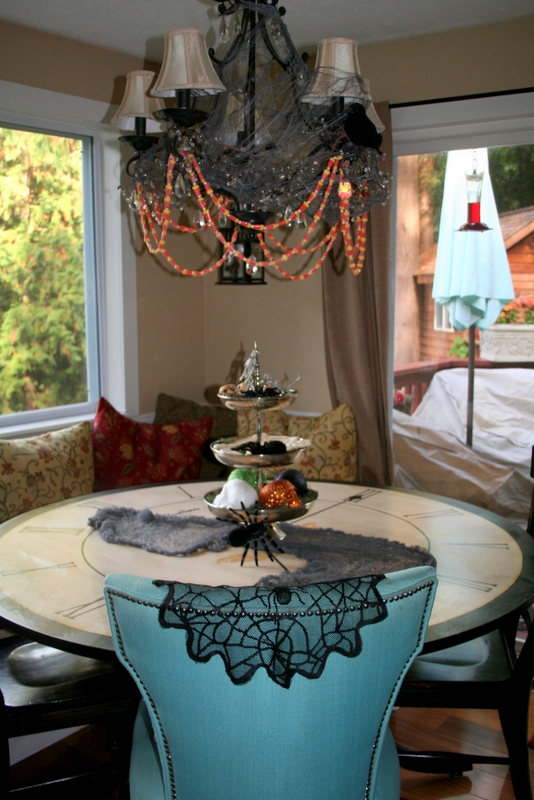
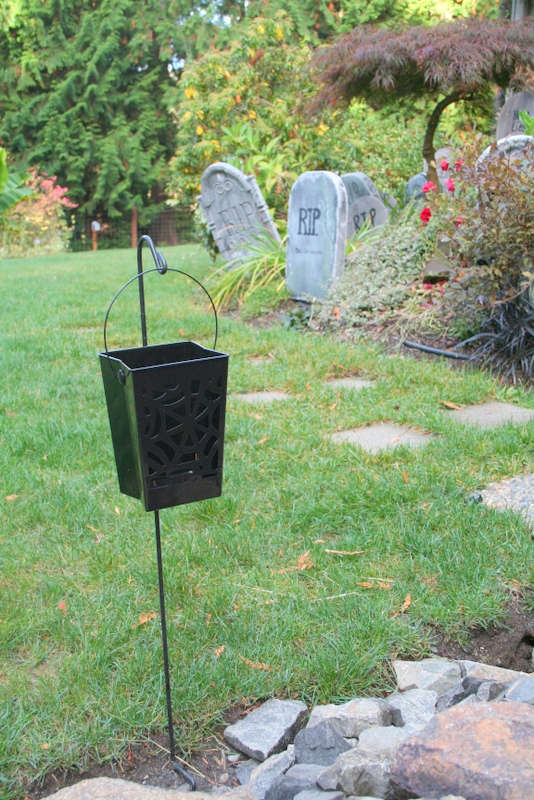
I am stuck at home after having shoulder surgery yesterday so I thought I would post some of my Halloween décor from this year today! You can see some of my past years as well if you click on Halloween on the right hand bar!


Thursday, October 11, 2012

Vinyl faces for your Halloween pumpkins!

 How cute are these?!  Use the vinyl decals for an easy, mess free Jack 'O Lantern face!


Thursday, November 10, 2011

Thanksgiving Decor Ideas

I have been working on my fall decor for Thanksgiving.  Here is my Thanksgiving Mantle and a beautiful gold platter that I found at Hobby Lobby and added one of my vinyl designs to it. 
The base of my swag on the mantle is a beautiful winter garland with snow dipped tips.  I love to add a little bit of winter to my Thanksgiving decor.  When Thanksgiving is over I just have to remove the Fall garlands and add Christmas items to it! 
Image Thankgsgiving vinyl decal decor

Image Thankgiving Mantle

Image Thankgiving Mantle

Wednesday, October 26, 2011

Thanksgiving Gratitude Board

I absolutely LOVE this idea!  What a great project to do with your kids or girlfriends!  The idea is to pull a card each day for each member of your family to write down what they are thankful for.  30 days of Gratitude...I love it!  I think I will add a spot at the bottom of the board where you can clip the "gratitude paper" on to display what has been written for the day.
I will post my board as soon as I make it! 


Here is the tutorial-

What you'll need: plywood board or foam board, brown paint, 30 coin envelopes, variety of scrapbook paper, vinyl or printed numbers, glue stick, Mod Podge, ribbons, hole punch, white cardstock, glue gun

Make it: Paint your board brown. Cut off the top part of your envelopes until they are 3 ¾-inch tall, and glue scrapbook paper to the front of each. Then, use Mod Podge to glue on the numbers 1-30 -- you can cut them out of paper with stencils or use stickers or vinyl. After your Mod Podge is dry, hole punch two small holes in the top of your envelope and tie a small ribbon through the holes. Use your hot glue gun to attach the envelopes onto the board -- five rows and six columns. Cut out a "Give Thanks" title and Mod Podge it to the top of your board. Insert a small piece of blank white cardstock into each envelope. Each night in November, ask your kids to pull the cardstock out on the appropriate day and write down something they are thankful for that day.

Here is another version from Embellishing Life Everyday.

Image Thankgiving vinyl decal

Tuesday, October 25, 2011

Thanksgiving Decor Ideas

Thanksgiving is just around the corner.  I absolutely love this time or year.  It is such a great time to snuggle in and refocus ourselves on family and friends.  I love to involve the kids when decorating.It creates fun memories and connects them to the special feeling of Thanksgiving!


Today I thought I would share a fun idea that is super simple and classy.  These are featured on
http://www.etsy.com/shop/funkyshique.  She can customize the banners or buntings to your liking.  The prices are very reasonable as well!  If you are a do it yourselfer, you could use burlap, stencils and a bit of paint and create your own. This would be a great project to involve the kids in as well. I know that you can purchase pre-cut burlap pendants at Joannes but it would be super easy and inexpensive to purchase burlap by the yard and cut your own!

Take it a step further and embellish your banners with buttons, bows or ribbon!

Tuesday, October 4, 2011

Halloween is SWEET!

Today I thought I would share some fun new to me Halloween recipes. Don't forget your presentation! It is a big part of the Halloween experience! Make the food just as BOOtiful as it is delicious! 

Adams Scary Apples
are STUNNING!  Have you ever seen more beautiful candied apples?
http://www.mattbites.com/

Red & Black Candy Apples

8-10 medium sized apples
8-10 wooden twigs, twimmed
3 cups granulated sugar
1/2 cup light corn syrup
1 cup of water
several drops of cinnamon flavored oil
1/4 teaspoon of red food coloring
1/4 teaspoon of black food coloring
Clean and dry the apples. Try to remove as much of the wax as possible. If you purchase them from your local farmer’s market then chances are they have not been treated with the food grade wax that makes then shine. Remove any stems or leaves and insert a twig into the end of each apple. To facilitate easier twig entry you can carefully sharpen the end of the twig or use a candy stick to create a guide hole. Set apples aside.
Heat and stir sugar, corn syrup and water in a saucepan until sugar has dissolved. Boil until the syrup reaches 300 degrees on a candy thermometer. Don’t go over 310 degrees or your candy burns and then you’ll be sad.
Remove from heat and stir in flavored oil and food coloring.
Dip one apple completely in the syrup and swirl it so that it becomes coated with the melted sugar candy. Hold the apple above the saucepan to drain off excess. Place apple, with the stick facing up, onto a baking sheet that’s greased or lined with a silpat. Repeat the process with the remaining apples. If your syrup thickens or cools too much, simply reheat briefly before proceeding. Let the apples cool completely before serving.
A note about the black apples: Lighter colored apples (Granny Smith, Golden Delicious) work well in making the red appear bright and glassy; darker apples like red delicious help the black candy appear as dark as possible. Muy spooky!
Also, Adam made one batch with red food coloring and after he had a few red apples he reheated the candy mixture and added black food coloring. Adding black to red will make it darker. He repeated the dipping process. Black food coloring can be found online or at specialty baking stores.

 
Moldy cheese balls!
ingredients
  • 1-8-ounce package cream cheese
  • 1 cup finely shredded Gouda cheese (4 ounces)
  • 1/4 cup butter
  • 1 tablespoon milk
  • 1/2 teaspoon Worcestershire sauce for chicken
  • 2 tablespoons thinly sliced green onion (1)
  • 2 tablespoons snipped fresh dill or 2 teaspoons dried dillweed
  • 1/2 cup chopped toasted almonds
  • Assorted crackers and/or flatbread

directions

1. In a large bowl let cream cheese, Gouda, and butter stand at room temperature for 30 minutes. Add milk and Worcestershire sauce. Beat with an electric mixer on medium speed until light and fluffy. Stir in green onion and dill. Cover and chill for 4 to 24 hours.
2. Before serving, shape cheese mixture into a ball. Roll ball in nuts and let stand 15 minutes. Serve with crackers or flatbread. Makes about 30 (1-tablespoon) servings.
3. Make-ahead directions: Prepare as above in Step 1. Shape cheese mixture into a ball; wrap in plastic wrap. Freeze for up to 1 month. To serve, thaw the cheese ball in the refrigerator overnight. Unwrap and roll in nuts. Let the cheese ball stand at room temperature for 15 minutes before serving.
4. Prosciutto-Basil Cheese Ball: Prepare as above, except substitute finely shredded fontina cheese for the Gouda cheese; stir in 2 ounces chopped prosciutto and 2 tablespoons snipped fresh basil with the green onion and omit the dill. Substitute chopped toasted pine nuts for the almonds. If desired, serve with apples, crackers, or flatbread.
5. Spicy Taco Cheese Ball: Prepare as above in Step 1, except substitute finely shredded taco cheese for the Gouda cheese, stir in 2 tablespoons bottled chopped jalapeno chile peppers with the green onion, and omit the dill. Substitute 1/2 cup crushed corn chips for the almonds.
6. To make logs: Divide recipe into 4 portions and shape accordingly.

This is another great way to serve the cheese ball-


Crock-Pot Baked Apples
Image and Recipe Copyright © 2008 Jennifer Iserloh
http://www.skinnychef.com

Makes 6 baked apples

Ingredients

1/4 cup brown sugar
1/4 cup walnuts, chopped
2 tablespoons trans-fat free margarine
1 teaspoon cinnamon
6 Gala or Macintosh apples, cored
1/2 cup apple juice or apple cider
2 tablespoons orange liquor (optional)

Directions

Preheat a large crock-pot on high heat and preset it for 3 hours. In a large bowl, mix brown sugar, walnuts, margarine, and cinnamon. Fill the apples with the filling and place them in the crock-pot. Pour in the apple juice or cider and the liquor, if using. Cover and cook 2 1/2 to 3 hours on high heat until the apples are soft and begin to collapse.

Cup of mac!

Ingredients


1 pound elbow macaroni
1 stick of butter
3 tablespoons Frank's Hot Sauce
2 large eggs
3 (12 ounce) cans of evaporated milk
20 ounces grated extra sharp cheddar cheese
8 ounce block of Monterey Jack cheese with jalepeno peppers, grated
salt and pepper to taste
Directions

Preheat oven to 350.
Boil the pasta until it is slightly under done. Drain and return to pot. Add butter, hot sauce, salt and pepper. Mix well and set aside.
In a bowl, beat eggs slightly, combine with evaporated milk and set aside.
In a second bowl, grate cheeses, combine and set aside.
Prepare muffin tins by spraying with cooking spray.
Stir of grated cheese to cooled pasta. Mix well.
Fill each muffin mold with cup of pasta mix.
Carefully pour enough milk/egg mix into muffin tins placed on cookie sheets.
Place in hot oven and bake for 45 minutes or until muffins have an evenly brown crust.
Remove pans from oven and allow cooling for 20 minutes.

Serve and enjoy!

Wednesday, September 28, 2011

Lets take a walk back in time....Ahhh, vintage Halloween! I just love it! These photos are all from Country Living. They have done a great job displaying many different vintage pieces. How fun would it be to be able to have an outdoor Halloween party?


I have found a couple designers that offer vintage holiday reproductions. Bethany Lowe Designs is one of the best! You can google her name to find a distributor. I have actually found some of her designs at TJ MAXX! It's a long shot so be there on their delivery day if you want to find the best of the best as her designs tend to be a bit more pricey so they are hard to find at a discounted price...but well worth it! Take a look at some of her designs. They are so darling!


Friday, September 23, 2011

DIY mercury glass tutorial~ Gorgeous!

This is such a great idea!  I just love the antiqued glass look.   You can see it everywhere now days but it can be very pricey.  These lamps from Pottery Barn are over $200.00!  The small pumpkin alone shown here sells for nearly $25.00.
Pottery Barn
Pottery Barn


DIY from Apartment Therapy
Here is a great way to get the same look for just pennies!

Supplies
Krylon Lookinglass spray paint
Spray bottle with a 50/50 vinegar/water solution
Paper towels.
Glass object of your choice
Craft Paper


First, if you are working on a lamp, spray the outside of the glass with the Lookingglass spray paint. If you are working on a bowl or vase, spray the paint on the inside of the glass. You will want to cover the outside of the vase with craft paper to protect it.  The lookinglass paint is very thin and runs easily so spray very sparingly. You will want to apply a few thin coats.  Let the paint dry for 3-4 minutes between each coat.   After the vases are completely dry you will begin distressing them. This where all of the magic happens!

Spray your vinegar and water mixture over the part of the glass you painted.
You just need enough mixture to cover the surfaces in little water beads. After letting the vinegar solution sit for approximately twenty seconds, dampened a paper towel with more of the vinegar solution and then rub the the insides of the glass. The vinegar solution will soften the paint.  Gently wipe away the moisture and little bits of the paint will peel away. After you have the worn look you desire, give your glass one last spray of lookingglass paint so that the clear spots are not completely bare.

I recommend one last coat of clear spray paint to seal the entire project! 

Thursday, September 22, 2011

Fall Couture!

I have been looking for some fun new holiday ideas and have found some absolutely beautiful fall decor! I thought I would share some of it with you!

Today I will be featuring "Fall Couture!" Take a look at some of these gorgeous fall centerpieces and still lifes! Just imagine the crowned pumpkin sitting in your little girls room! What a fun way to add a classy Fall touch to your home!

The 2nd and 3rd photos are fun as well! These can easily be done by painting or adding vinyl....(your's truely can help with that!)

Image Halloween Decor pumpkin                                                                      Cupids Charm


Halloween Decor pumpkin                                                                Magic Markings Art


Halloween vinyl decal pumpkins                                                                   Magic Markings Art

Friday, September 16, 2011

Vintage Halloween Luminary/Lantern~


I had so much fun making this cute vintage Halloween Lantern. You want to make one? Well here's how!


Supplies-

1. Wooden Box (WalMart, JoAnns, Michaels) I found mine at WalMart. It came in a 3 pack!

2. Halloween scrapbook paper. (3 different vintage inspired prints)

3. Modge Podge and brush

4. Velum Paper

5. Jigsaw, drill and bit

6. Light

First draw out a rectangle on the front of your box for the lantern's opening. Leave a 1" allowance around your cut. Next take your drill with a bit and make a hole inside of the area you will be cutting out. This is where you can start cutting with the jigsaw. This will give you a starting point. Follow your lines until you have cut out your opening for the lantern. If you have any rough edges, simply sand them to make them smooth.

Next, find the center on the back of your lantern and draw a small rectangle. This will be the hole for the light. Because some lights are different sizes, be sure to fit the hole to the light you will be using. Mine has the metal clips that help it stay nice and snug in the hole. Cut the hole about 2.5" from the bottom. Begin by drilling a hole just like you did in the front of the lantern. Continue with the jigsaw of a large drill bit.

Next spray the inside of the box with flat Black paint. (Don't worry about doing the outside, it will be covered.)

After the paint has dried, measure and cut your paper to cover the lantern. It is best to do the front first. Use separate pieces around the cutout. (One for the top, one for the bottom and one for each side.) Be sure to wrap the paper around the inside of the cutout so that you don't see any exposed wood. Continue to cover the entire wood box including the lid. I chose to use one pattern on the bottom portion of the box and 2 separate designs on the lid.

Adhere the paper with Modge Podge. Using a foam brush, cover one area of the box at a time and place the paper on the glue. Be sure to smooth out the paper as you go. A little goes a long way! Be sure you cover the entire area and move quickly. Modge Podge dries really quickly! A credit card works great to smooth out the paper as you place it.
After the initial glue dries, cover the entire area with a top layer of Modge Podge. This will help protect the paper. Next go online and search for "Vintage Halloween Postcard." Look under images and you will find many to choose from. Save the picture to your computer and prepare it to be printed on Velum paper. It is best to measure your opening and do a practice print on regular paper to be sure you have sized your image properly. If you have Adobe Photoshop open your image and click on image size. It gives you the option to enter the size you want in inches!

I chose an image that was a bit lighter than I wanted it to be so I made it darker in a photo editing program. I printed out 2 images and placed them directly on top of each other to make the velum a bit more substantial and it also helped deepen the colors of the print! If you are happy with the color of your print it is not necessary to "print" 2 copies but I would recommend using 2 layers of the velum paper.

Cut out the image. Make sure to leave allowance around the print for gluing. Next, glue the velum to the INSIDE of the lantern's opening!

You can now place your light inside!

BOOTIFUL isn't it!
*Be sure you don't use a bulb that will get hot! I am using a 7 watt night light. If you are worried about heat do not put the lid on the box. It is cute w/out it as well. You can also drill a few holes in the back for better airflow.
Just a girl who loves to create beautiful spaces and help others create an environment that best expresses who they are. Here you will find a wide variety of interior design and decorating ideas. Anything from DIY projects to beautiful design ideas. I offer several services: Interior and holiday decorating, home staging, organizing, color consulting and vinyl decals and lettering. Click on the "SHOP" tag and view a full line of pre-designed decals or I can design a custom one for you!